How to Get High Def Album Art on Madia Player
home
back to digital
back to PC software
Go to Part 2 (Configure Foobar for DSD)
Last updated xiv/2/2022

As the title of this thread this little guide/tutorial will try to accost but how to install and configure Foobar media player's nigh important audio related features such equally output modes and most mutual audio codec plugins. Information technology does not deal with any other aspects adding extra functionality such equally streaming, file tagging, etc. or cover the complete list of available input format plugins.
1.) Downloads.
Before installing anything, first download the player and desired plugins into the same piece of cake to locate folder, it makes installation and setup easier and quicker if everything is located in a single identify.
*** WARNING ***: The plugins come in with either .nothing or .fb2k (also a zip) file extension, unless specified, DO Non extract the content to the component binder, that method is not just not recommended merely tin actually cause problems with the player. When installing plugins Foobar extracts the contents automatically and places them in the right folder/s if you lot follow the instructions bellow (Affiliate #2).
ane.one) Foobar
The role player and near (but not all) plugins tin exist downloaded from hither: Link: Foobar 2000 download page
At this moment the most recent stable version available of the player is ane.6.10
1.2) PLUGINS
1.2.1) OUTPUT PLUGINS
By default Foobar uses DirectSound for outputting audio to the soundcard/DAC. DirectSound is designed as a single scrap depth and sample charge per unit method, this ways verything that differs from the configured system resolution volition get automatically resampled to match it. DirectSound past default is usually configured for 16bit 48KHz in most systems which negates whatever hypothetical benefit of higher scrap depths or sampling rates. It can be set to college values but Microsoft's upward/downwardly sampling algorithm'due south are not as adept as others available like SOX though some may argue that the differences aren't relevant every bit they are not hearable.
If you desire to get bit perfect (as in no resampling or additional processing) the best way is using any of the systems that avoid going through the Windows Mixer namely:
* ASIO(Electric current version: 2.1.2):
Not supported past all soundcards. It is a robust low latency manner
to become all the $.25 as shut to the original equally possible. Most Pro soundcards and DACs provide ASIO compatibility. I'd recommend them over WASAPI as, at least in my system, they achive lower DPC latency.
Link: ASIO plugin homepage
How to give ASIO procedure high priority automatically:
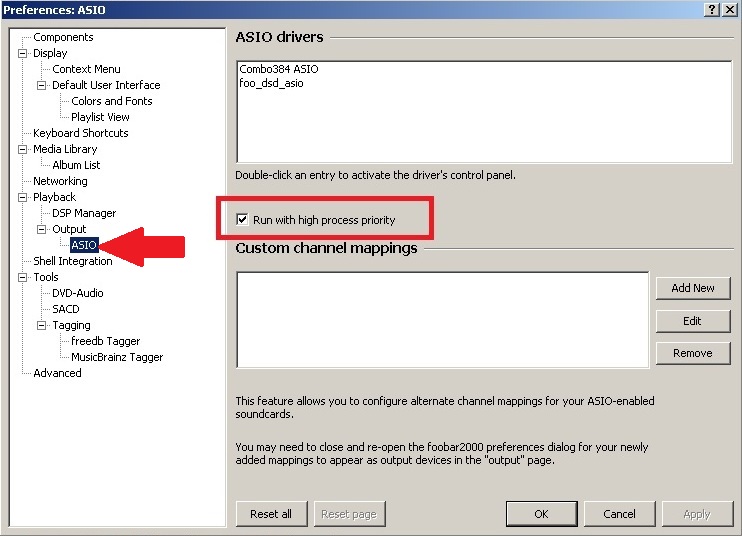
* WASAPI(Latest version: iii.4):
Important: Release 1.6.7 now includes WASAPI as default output wtih both exclusive and non sectional modes available making this plugin redundant unless your system has problem with the new component. (ten/08/2021)
Microsoft'south version of ASIO, about card will play using ane of the WASAPI modes. Like operation to ASIO and broader compatibility.
Link: WASAPI plugin homepage
How to requite WASAPI process loftier priority automatically:

Important NOTE:
In case of drop-outs, clicks and pops or stutter, WASAPI buffer size can exist adjusted in Preferences->Avant-garde->Playback->WASAPI. Detect separate values for Outcome and push manner are available (meet epitome beneath) so adjust the ane you lot are using.

If your soundcard/DAC accepts Outcome mode it would be the prefered mode, more info here:
Link: Additional info virtually WASAPI
Also since version 3.0 it is possible to configure independently buffers for either mode and run the WASAPI process with existent time priority. To access these settings follow this path:
File->Options->Preferences->Avant-garde->Playback->WASAPI
* Kernel Streaming(Latest version: one.2.2):
This was the predecessor of WASAPI introudced in Windows XP. Not recommended for Windows Vista SP1 or later on, use WASAPI instead.
Link: Kernel Streaming plugin homepage
1.ii.ii SOURCE/INPUT PLUGINS :
Foobar plays the most mutual files like MP3, MP4, AAC, CD Audio, WMA, Vorbis, FLAC, WavPack, WAV, AIFF, Musepack, Speex, AU, SND… equally standard but this list can be enlarged to embrace most any thinkable codec by using additional plugins. Adjacent is a recommended option for playing near mutual high resolution cloth:
* DVD-A(Current version: 0.5.two):
-"DVD-Sound Decoder input plugin and Watermark Detector/Neutralizer DSP plugins for foobar2000. Decoder is capable of playing back DVD-Audio discs, ISO images, AOB, MLP and Dolby TrueHD files in total resolution. Dedicated plugin for DTS-HD playback."-
Link: DVD Audio plugin homepage
* SACD(Current version: i.iv.iv):
This plugin is capable to decode Super Audio CD ISO image content every bit well equally DST, DSDIFF and DSD files.
This plugin contains Lawmaking FROM SACD Ripper http://code.google.com/p/sacd-ripper/ projection.
A modify log is included in the nothing file.
Check part 2 of this guide HERE for more information on how to ready it up
**RECOMMENDATION** Do not install nor employ the DSDIFF decoder plugin available at the Foobar's component page. Information technology is obsolete, performs worse and has less functionality than foo_sacd_plugin and tin make the player crash when both DSD related plugins are installed at the aforementioned time.
Link: SACD plugin homepage
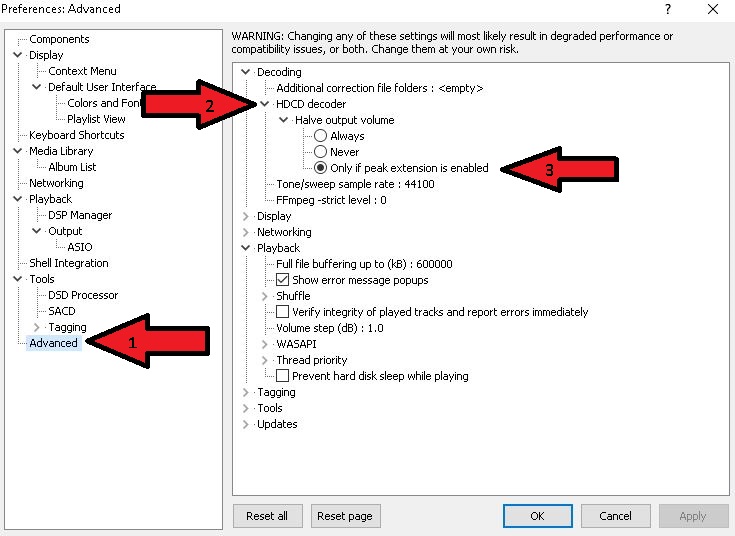
* HDCD decoding (Latest version 1.19):
Apply this plugin if your DAC doesn't have native back up for it and yous want to get the benefits of HDCD encoding.
-"This postprocessing service component will decode HDCD information in whatsoever xvi-scrap PCM stream passed through it by supporting inputs, such as CDDA, WAV, FLAC, and WavPack.
I recommend using the following setting to correctly play HDCD enconded files though some CDs had incorrectly set the PE flag:
Link: HDCD plugin homepage
* Monkey (.APE files, Latest version ii.5):
-"Adds decoding support for Monkey's Audio files (.APE) likewise as APE Link files (.APL)."
Link: Monkey audio plugin homepage
Other non so common but withal interesting codecs are AC3 (AKA Dolby Digital) and DTS. If yous happen to have files encoded with either of these codecs the post-obit plugins volition demand to be installed:
* AC3
Adds decoding support for ATSC A-52 bitstream files (.AC3). Also includes a packet decoder for Matroska files containing AC3 streams
Link: AC3 plugin homepage
* DTS
Adds decoding support for DTS Coherent Acoustics files (.DTS) and DTS WAV files (.DTSWAV). Too includes a package decoder for Matroska files containing DTS streams, and a decode postprocessor which supports decoding DTS streams from 44100Hz or 48KHz 16-bit lossless PCM streams. (Implementing support for this in other inputs is beyond my control. Currently implemented formats include WAV, audio CD, FLAC, Wavpack, and TAK.)
Link: DTS plugin homepage
* De-Emphasis Processor
In lodge to correctly play CDs or files encoded with Pre-Emphasis (for more information run into https://wiki.hydrogenaud.io/alphabetize.php?title=Emphasis) a de-emphasizing component must be installed and a "Pre-Emphasis" or "Pre_Emphasis" tag added to the album files with "1", "on" or "yes" every bit value.
De-emphasis components
2.INSTALLATION
Once the histrion and all plugins take been downloaded first step will be installing the player.
The first pick given in the installation process is installation type, standard or portable. If y'all plan to customize heavily Foobar and use it on more than one estimator portable installation can be a skilful idea equally it can be copied to a USB flash drive and shared beyond many PCs keeping the configuration (as long as hardware is compatible besides). For use on a single estimator choose standard. After that Foobar asks for the installation path and options (I recommend checking all).
In one case the histrion is installed, to install the additional downloaded plugins follow the red arrows in order:
(Note: by default when preferences are opened Foobar goes to the "components" department, if for any reason this doesn't happen click on information technology to access the window shown beneath)

All installed components are shown inside the green rectangle. To add another click on install (red arrow #3). Point the window that pops upward to the folder where all plugins have been previously downloaded choose any one and repeat WITHOUT clicking "Use" or closing the player until all have been installed. Don't worry if just after installing a plugin it reads "Unknown" in the installed components listing, they'll evidence their name and version once Foobar is re started.
3. PLAYBACK CONFIGURATION
To acces all playback options click on the"+" sign past "Playback" on the left pane of preferences expanding it.
three.1 Disable replay gain
Some files have a tag specifying replay proceeds that will adjust loudness automatically for that runway, when used on all files it reduces de demand to achieve for the amps volume potentiometer but it does so at the expense of "fleck perfectness". If you prefer to control volume with your amp's knob this can exist disabled as follows:
When "Playback" is selected in the left pane the correct pane will show this:
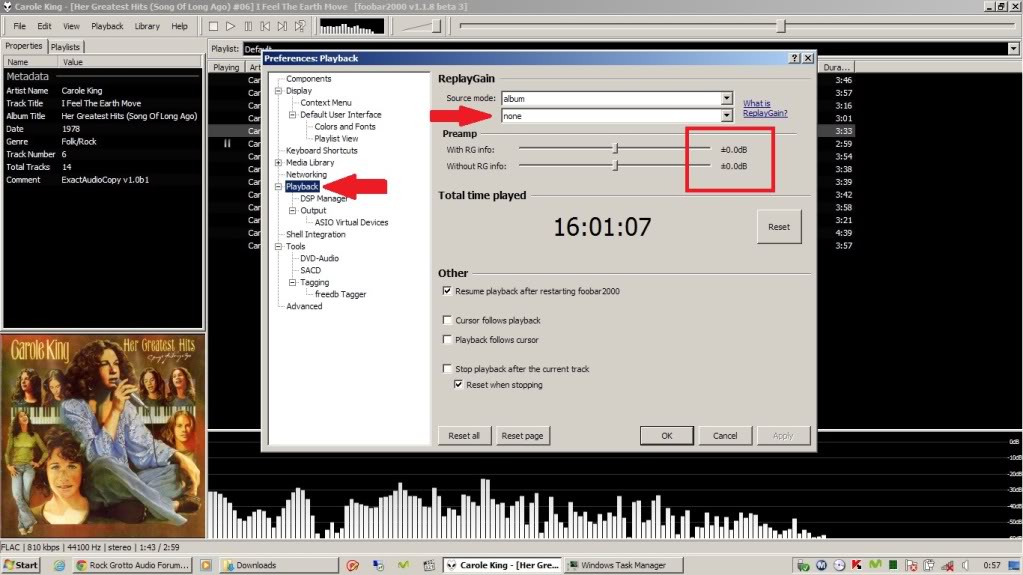
In the 2nd driblet down list labeled "Processing" select "None"
For extra security 0dB can exist selected in both the Preamp sliders.
three.two DSP Options
Foobar has some built-in DSPs that are disabled by default, they tin be enabled by accessing them in the DSP entry on the right pane and looks like this:
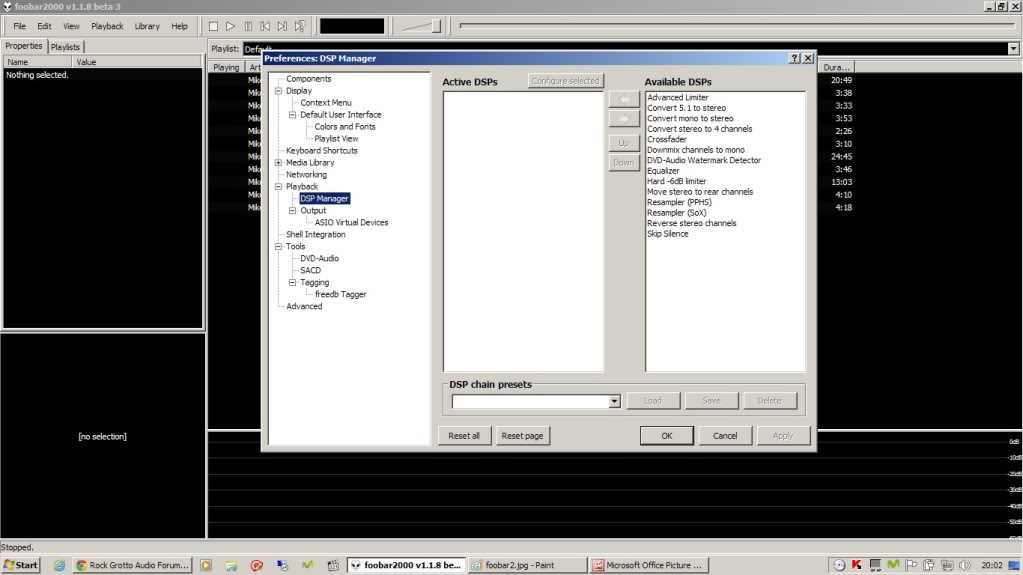
On the motion picture above you lot tin see the default ones plus two I added, the DVD_A plugin and a SOX HQ upsampling plugin.
The simply one I use from time to time is the "Catechumen 5.one to Stereo" because my Musiland is not so expert at downmixing.
DSPs are not installed here just as any other plugin, here they are just enabled/disabled and configured (when bachelor).
3.3 Output
This section is key to get the all-time out of Foobar and your organization.
Available options depend on installed output plugins. First click on output on the left pane and so on the left i click the drop down listing under "Device" to get something like the adjacent motion picture:

The epitome shows all available outputs to Foobar. In this example the laptop I'1000 using has ii sound cards, the onboard Realtek (using Windows default "Loftier Definition" drivers instead of the proper ones but that is a unlike story) and the Musiland 02. As each sound card has more than ane out the list is quite long.
At that place is one entry for each way out under each type of output, for instance, it is possible to route the music to the Musiland's counterpart outputs using:
– ASIO: Musiland Monitor Series (USB)
– DS: Speakers (Musiland Monitor 02 US)
– KS: Monitor 02 US [0001]
– WASAPI: Speakers (Musiland Monitor 02 US)
Every bit the Musiland besides has SPDIF out the above is repeated but with replacing "Speakers" with SPDIF.
For testing purposes ASIO4ALL is installed but only for the onboard audio chip.
three.3.1 ASIO Virtual Devices
Before accesing a device through ASIO a virtual device has to be created beginning. If our sound card has a native ASIO driver or we have installed ASIO4ALL we tin add together information technology to Foobar'due south list by clicking the "ASIO Virtual Devices" entry beneath "Output" on the left pane and the next will exist shown:

Follow the arrows in the aforementioned order to add a device. The ASIO Device Editor will show in the drop down list all ASIO drivers known to your O.South. (AKA Windows) exist it only one or as many as ASIO compatible audio cards you have in your reckoner. Select one, click OK and configuration is over.
4. Additional PLUGINS CONFIGURATION
Some Plugins create entries on the left pane where their options tin can exist configured. Both DVD-A and SACD plugins do this, and in the SACD case, for example, you lot can choose its output format (PCM, DSD or Machine), PCM's sampling rate (24/88.2 or 24/176.4) and, if wanted, extra gain (0 to +6dB). Get to function 2 for further instructions.
5. PLAYING FILES FROM RAM IN FOOBAR
For those interested in playing from RAM here is are the required steps to setup Foobar to load the unabridged file to played in RAM and play it from there instead of the HDD, this fashion there will no disk access during play avoiding possible mechanical noise, reducing heat and power consumtion.
This merely works for music files and not for large .ISOs, .CUEs or other "list" files. If a disc is ripped to a single file and loaded into Foobar to play it from RAM information technology volition exist impossible to navigate tracks and guessing will exist required to find the begining and the end of each vocal. This can be avoided by simply ripping to an indivual file per track
When configuring the RAM buffer comport in mind total arrangement memory, most modern PCs come at to the lowest degree with 3 or 4GB which should leave plenty for a quite large buffer provided you are not running multiple apps when listening to music. Also, 32bit and 64bit take dissimilar requirements the later needing more RAM for system services and apps.
500,000KB (500MB) should be more enough for an entire CD ripped to a single FLAC. If ripping to WAV the buffer may need to be increased to 800,000KB in order to brand sure even the biggest file can be fully loaded. If all your music is in file per runway format then 500,000KB should suffice for even 24/192 WAVs or DSD DSF or Unequal files. Note that the value entered is the maximum Foobar will utilizeonly if needed, if file being played is smaller information technology will just use the equivalent to the file size + overhead + Foobar's ain lawmaking.
On the side by side pic the path to where to change this setting is shown:

Foobar running in default config (value = 0KB) testify aprox. 60MB are used

Foobar with a value of 800,000KB and a 454MB FLAC playing:

six.Customizing the current runway information in the status bar
Here is an case of how it is possible customize the displayed data in the status bar (lower left part of the screen) so it shows relevant technical infomation about the track being played.
Articulate whatever the "Condition bar" box contains (see screen capture below) and paste the post-obit into it:
%codec% | %samplerate% Hz | $if(%__bitspersample%,%__bitspersample% bits,'North/A') | %channels% | %playback_time%[ / %length%] | %bitrate% kbps $ifequal($meta(pre-emphasis),1,'| Pre-Emphasis',)$if(%__hdcd%,'| (HDCD: PE: '%__hdcd_peak_extend% LLE: %__hdcd_gain% TF: %__hdcd_transient_filter%')')

When applied you will get: file format, sample rate, flake depth, current time/total track time, bit rate and, in case an HDCD encoded file is played, all HDCD information.
Examples of information shown when using the above mentioned lawmaking:
Regular Red Book (aka CD) sourced FLAC
![]()
CD sourced HDCD encoded FLAC (the HDCD component decodes to 20bit and patches with ceros to 24bit hence the "24 bits" displayed)
![]()
CD with Pre-Emphasis (present in some early on 80s CDs)
![]()
High Resolution 24/192 PCM FLAC file
![]()
Standard SACD quality (DSD64) file
![]()
Higher resolution DSD256 file
![]()
Standard SACD multi channel (5.one) DSD64 file
![]()
High resolution multi channel (v.1) 24/96 PCM FLAC file
![]()
.
home
back to digital
dorsum to PC software
0 Response to "How to Get High Def Album Art on Madia Player"
Postar um comentário